July 19, 2026
Station Setup
This guide has two parts. Part 1 is for station users who need to add an existing station. Part 2 is for station owners who need to configure a new station.
Part 1 - Add an Existing Station (for station users)
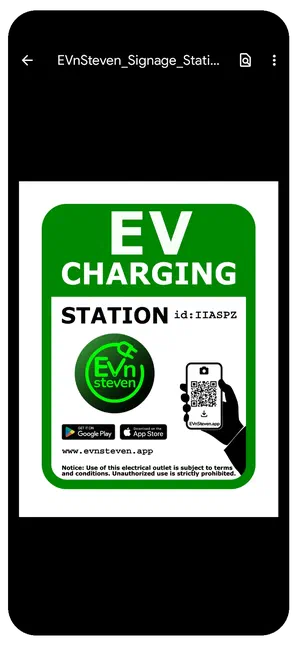
EVnSteven is designed for semi-private locations where the station owner and users already know each other — think a property manager and their tenants. The station owner posts official signage at the outlet with a station ID and QR code. Just search by ID or scan the code, add it to your account, and you’re good to go.
Part 2 - Configure Your Station (for station owners)
You’ll need to gather a few details before setting up. Here’s what each field requires:
Owner Info
- Owner: the name of the individual or company that owns the station
- Contact: the full name of the authorized representative
- Email: the contact email for station-related correspondence
Location Info
- Location name: a descriptive name for the outlet, e.g. “Volta Vista Condos L1” or “Lakeview Estates - P12”
- Address: the full street address including city, state, and zip code
- Timezone: the timezone where the station is located, used to calculate time-of-day rates correctly
Power
Enter the power rating directly, or use the built-in calculator with Volts and Amps:
- Volts: typically 120V for Level 1, 240V for Level 2
- Amps: typically 15A for Level 1, 30A for Level 2
- Power rating: typically 1.9 kW for Level 1, 7.2 kW for Level 2
Not sure? Your electrician or station manufacturer can confirm the right values.
For the most accurate power rating, ask your electrician to do a one-time measurement using a current clamp — a tool that clips around a wire and measures the electricity flowing through it without cutting into anything. With a specific vehicle plugged into a specific outlet, the power draw is constant and won’t change. That one measurement tells you exactly what to enter, and you’ll never have to guess again. Accurate numbers mean fairer billing for your residents and fewer questions down the road. Everyone wins.
Tax
If you collect sales tax, enter the details here. Otherwise leave the defaults and move on.
- Code: a three-letter abbreviation, e.g. “GST”
- Percentage: the tax rate, e.g. 5%
- Tax ID: your tax identification number
Currency
Select the currency your users will be billed in.
Currency Selection
Currency cannot be changed after the station is saved. If you need to change it, delete the station and create a new one.
Checkout Time Adjustment
Optionally allow users to adjust their check-in and check-out times upon checkout. Useful for dedicated stations with a high level of trust between owner and user. Disabled by default.
Terms of Service
You are required to provide your own Terms of Service for your station. Consult a qualified legal professional to prepare it, then paste the plain text into the field. Users must accept your terms before their first session. Each time you update the terms, users will be prompted to accept the new version. A copy is emailed to both parties upon acceptance.
Rate Schedule
Set up to 5 time-of-day rates. The total time across all rates must equal 24 hours. Use the built-in rate calculator (the “Calc” button) to estimate an hourly rate based on your cost per kWh and station power rating. If you have multiple stations at the same location, load a previously configured schedule using the “Load” button.
Setting your rates is a bit of an art. You want to stay competitive while making sure you’re not losing money. Too low and you’re subsidizing your residents’ electricity bill; too high and nobody uses the station. Review your rates from time to time — especially when your utility rates change — and adjust as needed.
When you update your rates or terms of service, users are automatically notified at the start of their next session and must agree before continuing. A copy of every change is emailed to each party, creating a permanent record for everyone.
Example names: “2024 Q1 L1 Outlets”, “2024 Q1 L2 Outlets”.
Save Your Station
Tap save and your station is live. Users can find it by station ID or QR code right away.
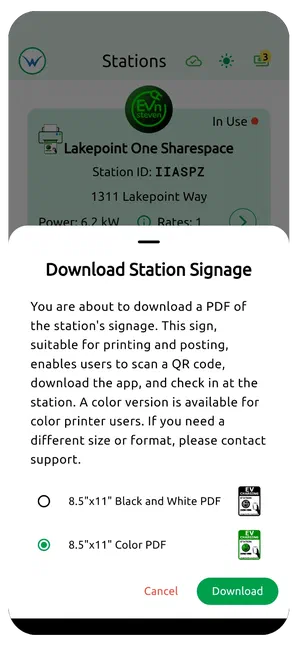
Print Station Signage
- Tap the Stations icon at the bottom left of the app
- Tap the printer icon on the station card
- Select color or black and white
- Tap download
- Print and mount the sign next to the outlet